Schedules
The Schedules widget allows automating the execution of both Operations (e.g., Start, Stop, Restart) and Assigned Actions. This widget is available on the Deployment, Resource Group, and Compute Node levels.
By defining Cron expressions, routines may be scheduled to optimize resource usage - such as automatically stopping a deployment over the weekend to save computing costs.
Widget Overview
The Schedules widget uses a table-based interface to display all upcoming automated tasks. By default, the table is sorted by the Next Run (Local Time) column, showing the earliest upcoming schedules first.
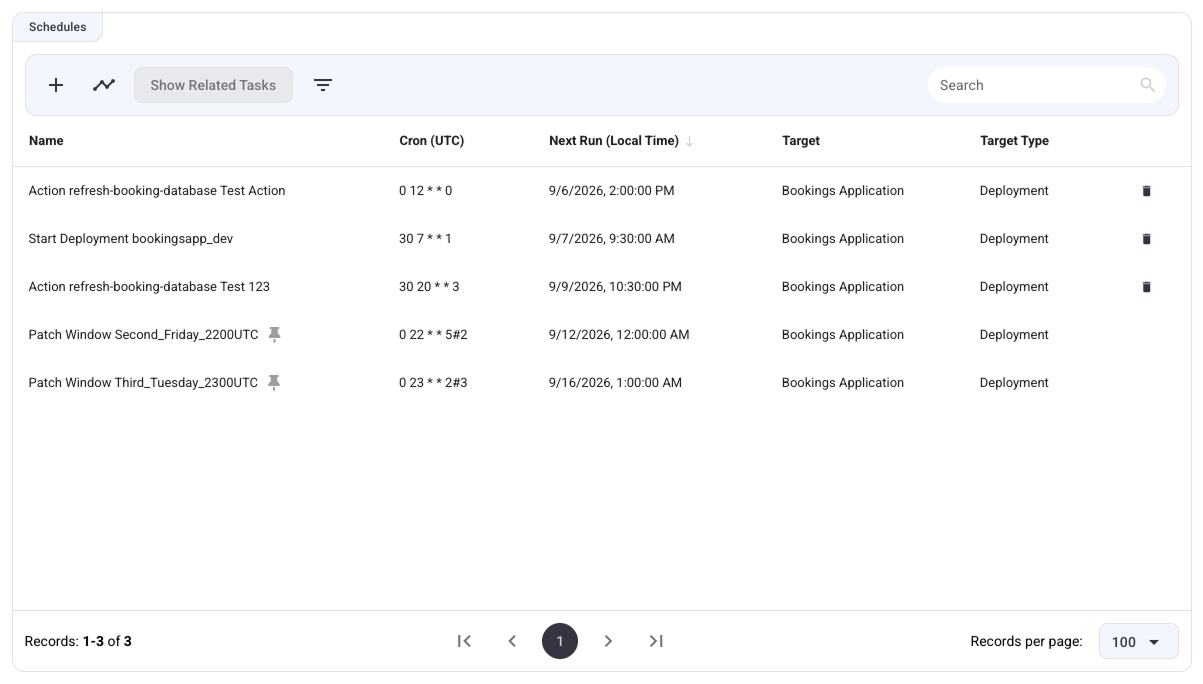
Table Columns
- Name: An automatically generated name describing the schedule (e.g.,
Start Deployment bookingsapp_dev). - Cron (UTC): The Cron expression defining the schedule's frequency, stored and evaluated in UTC.
- Next Run (Local Time): The exact date and time the schedule will execute next, converted to your local time zone.
- Target: The name of the specific item the schedule applies to.
- Target Type: The object type of the target (Deployment, ResourceGroup, VirtualMachine).
- Actions (Right Column): Quick action to Delete (bin icon) the schedule. Clicking the bin icon opens a confirmation dialog; click Delete to confirm the removal.
Special Rows: Patch Windows
Rows marked with a pin icon instead of a delete bin icon. These represent Patch Windows.

Patch Window Caveats
Patch window schedules are merged into this table from a different API. Because of this:
- They are visible on every page of the table.
- They do not count towards the total records shown in the bottom pagination.
- They cannot be deleted directly from this widget.
- However, standard table filtering, sorting, and the Timeline functionality still apply to them.
Creating a Schedule
Create a schedule by clicking the Add (+) button in the widget's top action bar, or by clicking the clock icon in the item's top operations bar. This opens the Manage Schedule dialog. Upon successfully saving a new schedule, a success notification will pop up and the new row will appear in the widget.
Scheduling an Operation
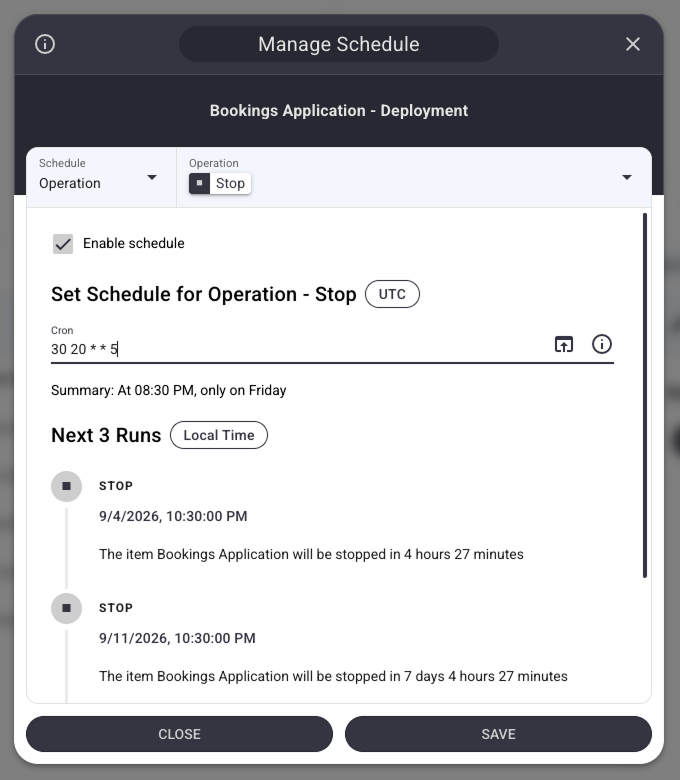
- In the first dropdown, select Operation (this is the default).
- In the second dropdown, select the specific operation to schedule (e.g., Start, Stop, Restart).
- Check Enable schedule.
- Enter a standard Cron expression. Note the external link to crontab.guru and the info tooltip provided for guidance.
UTC vs Local Time
Cron expressions are evaluated strictly in UTC. Always verify the "Next 3 Runs" preview at the bottom of the dialog, which converts the schedule into your Local Time so you know exactly when it will execute.
Scheduling an Action
- In the first dropdown, select Action.
- The second dropdown will populate with all actions currently assigned to the item. Select the desired action.
- Check Enable schedule and enter your Cron expression.
Required Parameters for Actions
Attempting to schedule an action that was previously assigned without its required parameters filled out will return an error. Go to the Assigned Actions widget first, edit the specific action to fill in the missing parameters, and then enable the schedule directly from that edit dialog.
Visualizing the Timeline
The Schedules widget includes a Timeline feature to help visualize upcoming automated runs.
- Open the Timeline: Click the Timeline icon (the zigzag line next to the Add button) in the top action bar. If no rows are selected, a right-side splitter pane will open showing the next 2 runs for all schedules in the table.
- Filter by Selection: Click on one or multiple rows in the table to filter the timeline. The timeline will update to show only the next 2 runs for the selected schedules.
- Highlighting: Hovering the cursor over a selected row in the table will highlight its corresponding run events in blue within the timeline.
- Deselection: Click a currently selected row to manually deselect it and remove its runs from the timeline. Deselecting all rows manually will revert the timeline to its default behavior (showing the next runs for all rows).
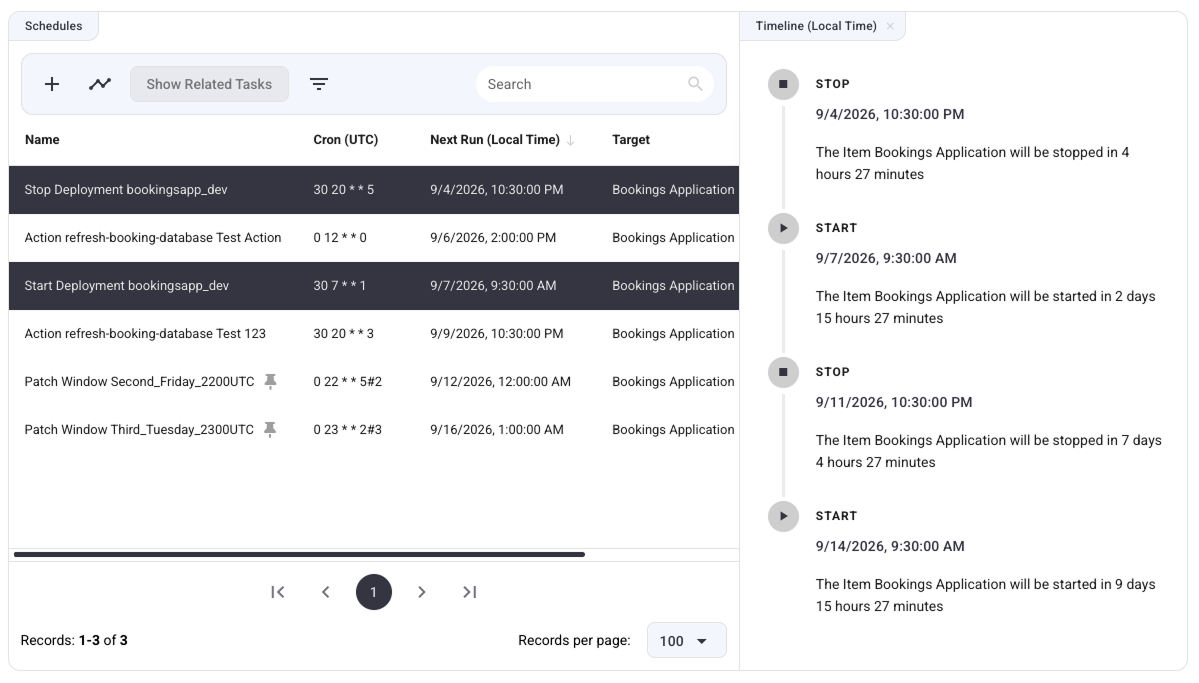
To close the timeline entirely, click the X button at the top left of the pane, drag the splitter to the right edge of the widget, or click the Timeline icon in the top action bar again to deselect all rows and close the pane.
Viewing Related Tasks
Because the infrastructure is hierarchical (Deployments contain Resource Groups, which contain Resources), the Schedules widget provides a way to view all schedules across the entire hierarchy of the current view.
Click the Show Related Tasks button in the top action bar to reveal parent tasks and child tasks.
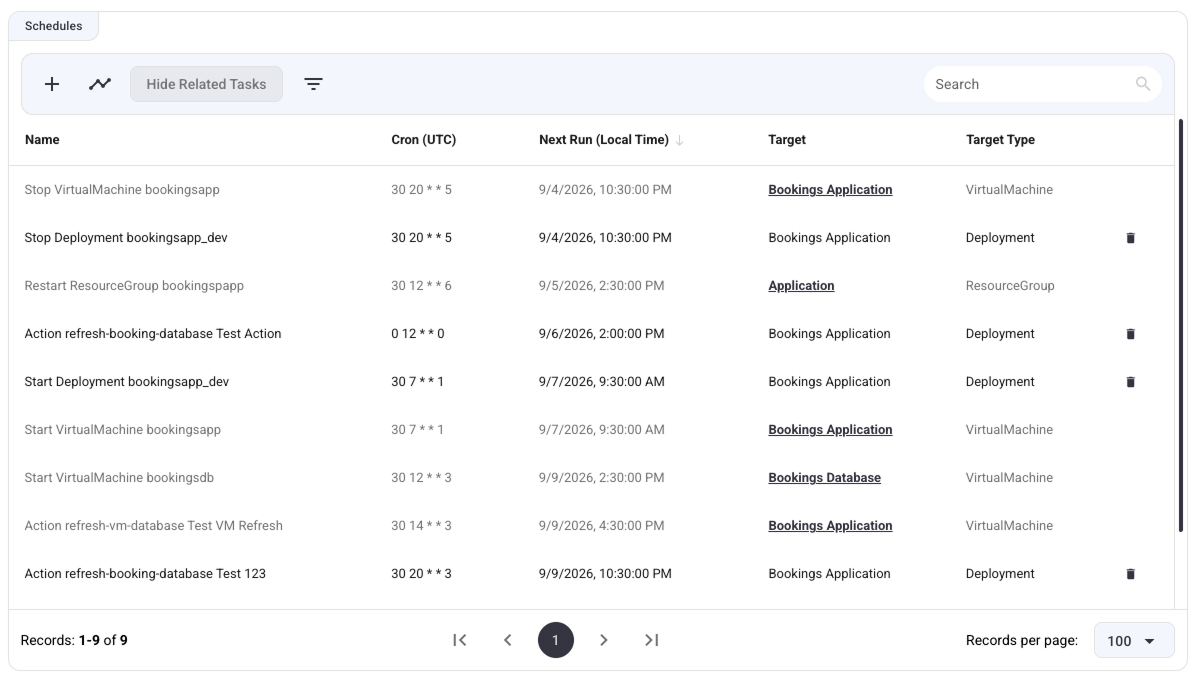
- The table will populate with all schedules belonging to related items. For example, viewing a Deployment shows schedules for its child Resource Groups and Virtual Machines. Conversely, viewing a Resource Group will show schedules for its parent Deployment as well as its child Virtual Machines.
- The button text changes to Hide Related Tasks. Click it again to toggle the view off.
- Related tasks are color-coded with a gray background to differentiate them from schedules belonging directly to the current item.
- Navigation: The text in the Target column for related tasks becomes a clickable link. Clicking the target name will navigate directly to that item and scroll down to its respective Schedules widget.
- Filtering Utility: When related tasks are visible, the table's filter menu becomes especially useful. Filter by Target Type or Target to easily locate specific schedules across the hierarchy.
- Constraints: Related tasks cannot be deleted from this view (the bin icon is removed). Patch Windows for related tasks are not merged into this view; only the Patch Windows for the currently selected item will be displayed.